

Whether you’re building a presentation with PPT Maker or updating an existing PowerPoint deck, small visual details can interrupt your workflow. A photo fits the layout, but the person faces away from your headline. A replacement image suddenly appears backward. Before sharing your slides, you need a quick way to get the picture facing the right direction.
To flip an image in PowerPoint, select it, open Picture Format → Rotate, and choose Flip Horizontal or Flip Vertical. Depending on your ribbon layout, Rotate may sit inside the Arrange group. You can also look under Home → Arrange → Rotate.
For a normal picture, that takes just a few clicks. If you searched “how to flip image in ppt” because the command is missing or the picture keeps changing after you save, the sections below explain what to check next.
How to Flip an Image in PowerPoint
Start by selecting the picture itself. A border with sizing handles should appear around it, and the Picture Format tab should become available. If you see a text cursor instead, click outside the text box and select the image again.
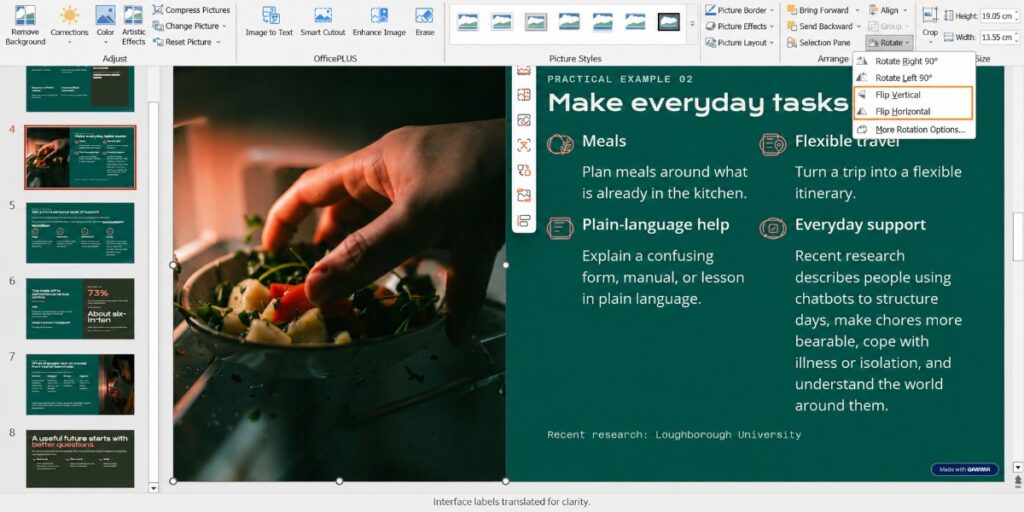
Flip an Image Horizontally to Create a Mirror Image
Choose Picture Format → Rotate → Flip Horizontal to reverse the picture from left to right.
This is useful when a person, vehicle, or arrow points toward the edge of the slide. A horizontal flip can turn the subject toward your text, making the layout feel more connected without replacing the photo.
Before you flip an image horizontally in PowerPoint, check for lettering, logos, signs, or recognizable details. They will reverse along with everything else in the picture. A portrait against a plain background may work beautifully; a product photo with a visible label usually needs more care.
Flip an Image Vertically
Choose Picture Format → Rotate → Flip Vertical to reverse the picture from top to bottom.
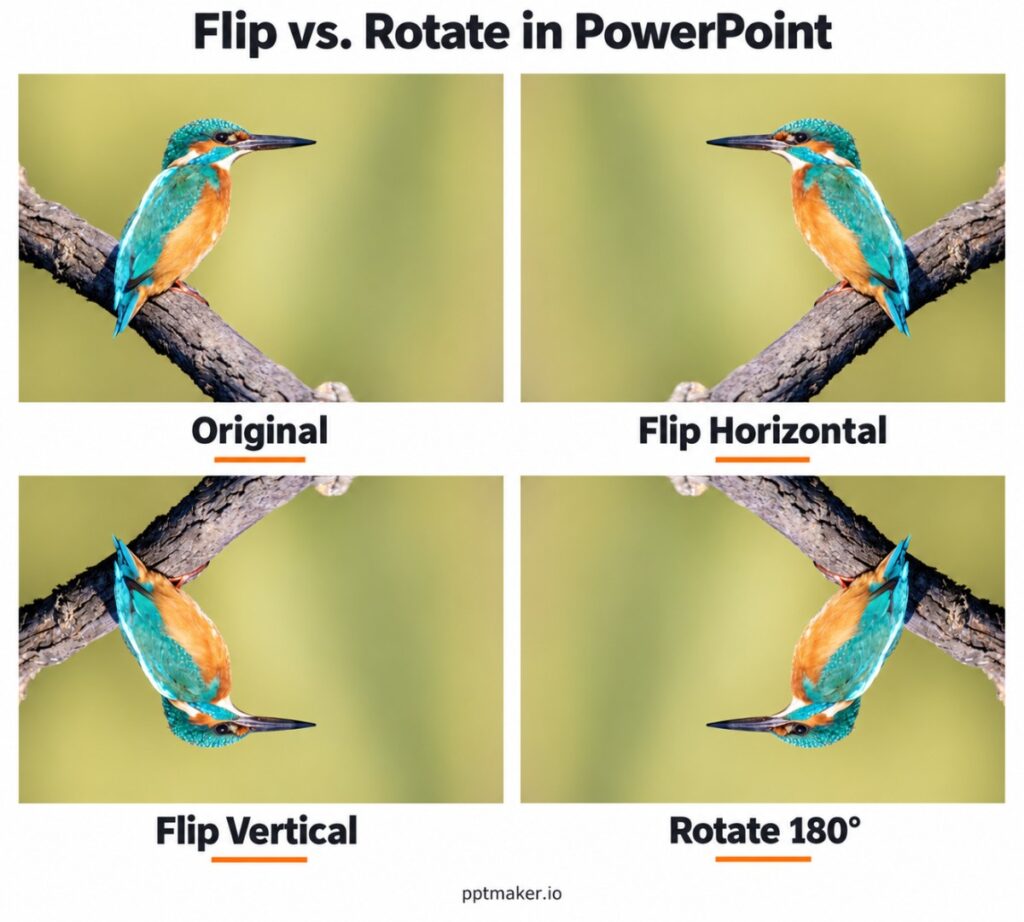
A vertical flip can help create a reflection or reverse a decorative graphic. It does not produce the same result as rotating a photograph 180 degrees, so avoid using it automatically whenever something looks upside down.
After you flip an image vertically in PowerPoint, compare the result with the surrounding content. If the direction is wrong, use Undo immediately: Ctrl+Z on Windows or Command+Z on Mac.
Flip vs. Rotate: Choose the Right Option
Knowing how to flip a picture in PowerPoint is only useful if flipping produces the result you actually want. The Rotate menu contains both operations, which makes them easy to confuse.
Change the Direction a Person or Object Faces
Use a horizontal flip when the subject needs to face the opposite direction. The picture stays upright, but its left and right sides exchange places.
Imagine a customer testimonial slide with a portrait on the right and a quote on the left. If the person faces outward, creating a mirror image in PowerPoint may bring their gaze toward the quote.
Check the meaning of the image, too. Reversing a generic arrow may be appropriate. Reversing a map, diagram, or screenshot could make the information incorrect.
Fix a Sideways or Upside-Down Photo
A sideways photograph normally needs Rotate Right 90° or Rotate Left 90°. A photograph that is completely upside down usually needs a 180-degree rotation, which you can achieve by applying a 90-degree rotation twice.
Rotating turns the whole picture around its center. Flipping reflects it across an axis.
If you flip an image in PowerPoint and a sign becomes backward, you may have chosen a reflection when you needed a rotation. Undo the change and try the appropriate rotation command.
Why Won’t My Picture Flip Correctly in PowerPoint?
An ordinary inserted photo is straightforward to adjust. Problems become more confusing when you inherit a template, work in the browser, or reuse pictures that already have formatting attached.
The Picture Format Tab or Flip Command Is Missing
Picture Format is a contextual tab: it appears when a suitable picture is selected. Click the image’s visible area or border, rather than the slide background.
On a narrow window, some commands collapse into groups. Open Arrange if Rotate is not immediately visible. In PowerPoint for the web, look for the Picture tab and its arrangement controls; the simplified ribbon may place additional commands behind an ellipsis.
You can also try the command search box. Searching for the flip command is often quicker than comparing your screen with a tutorial made for a different ribbon layout.
The missing button does not necessarily mean you need a paid image editor to flip a picture in PowerPoint.
The Picture Is Locked, Grouped, or Hard to Select
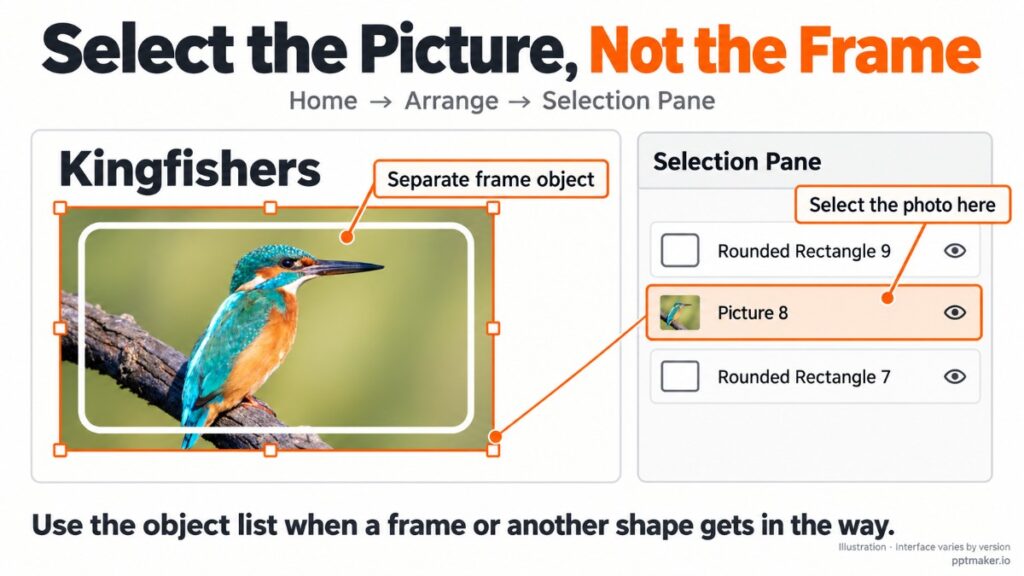
A template may contain overlapping objects that make the photograph difficult to click. Open Home → Arrange → Selection Pane and select the relevant object from the list.
If your version shows a lock beside it, unlock it before editing. For grouped content, select the individual picture within the group where possible. Ungrouping is another option, but check the layout and any animations afterward.
A slide background behaves differently from an inserted picture. If you cannot select it as an object, inspect Format Background. You may need to prepare a flipped copy of the source image and replace the background fill.
A Replacement Picture Appears Mirrored
Suppose you replace an employee portrait in last month’s presentation. The new photo looks correct in its folder, yet appears backward on the slide.
The existing object may already carry a horizontal flip. Change Picture can preserve that formatting when it brings in the replacement.
Try Flip Horizontal once and inspect the result. If the template continues to produce unexpected behavior, insert the source image as a new picture and position it carefully over the old one before removing the old object.
This is an important distinction: learning how to flip an image in PowerPoint can help you undo inherited formatting as well as create a new effect.
Pictures Rotate or Stretch After Saving and Reopening
This problem can consume far more time than the initial edit. You correct several photos, save the presentation, and reopen it to find that some have rotated or become stretched again.
JPEG files from cameras and phones may contain orientation information that different applications interpret differently. That is one possible cause, especially when portrait photographs behave differently from landscape ones.
Keep a backup, then try correcting the image’s orientation in an image editor and exporting a fresh PNG. Insert that file into PowerPoint, save, close, and reopen the presentation to check whether the change holds.
Another workaround is to copy a correctly displayed picture and use Paste Special → PNG, where available. Inspect its sharpness and dimensions before replacing the original.
Neither approach guarantees a fix for every file. If the problem occurs only on another device, test there as well. Repeatedly choosing a flip command will not resolve every orientation or rendering issue.
How to Flip a Picture Inside a Shape Without Flipping the Shape
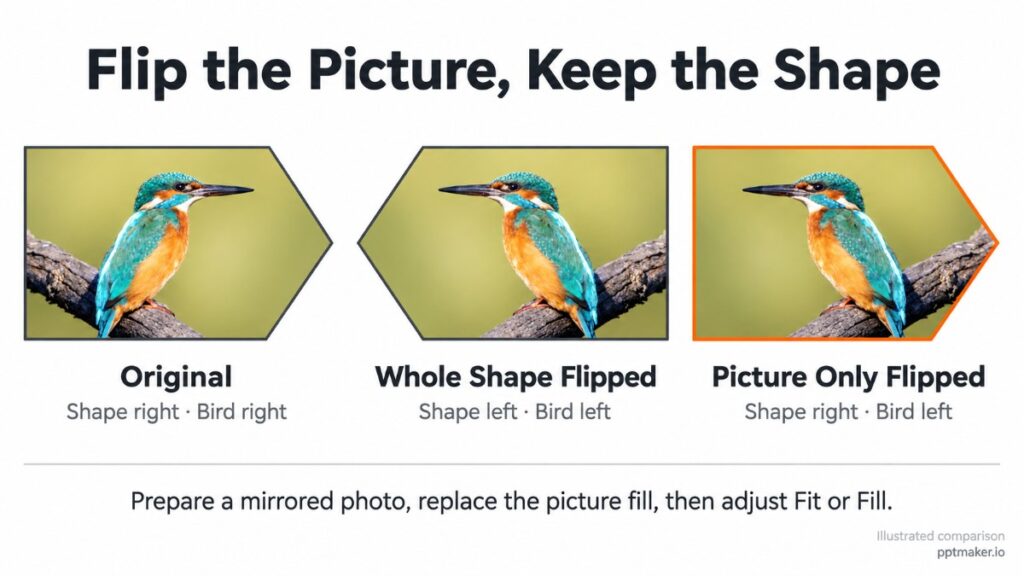
A photo inside an asymmetric frame creates a different challenge. You want the person to face left, but flipping the object also reverses the teardrop, arrow, or other container.
Prepare the Flipped Picture
The clearest approach is to handle the picture’s direction separately from the shape.
If you have the original image, insert a temporary copy onto an unused slide. Flip the picture in PowerPoint, check that the subject faces the right way, and save a separate image copy if your next step requires a file.
Keep the original available. Exporting or copying a picture can change how it is represented, so inspect the result at the size you intend to use.
Replace the Picture Fill and Adjust the Crop
Select the destination shape and replace its picture fill with the prepared image. Depending on the object, you may work through Format Shape → Picture or texture fill, or use picture replacement controls.
Then check the framing. Fill covers the shape but may crop part of the photo; Fit keeps the entire picture visible and may leave space around it.
The “Rotate with shape” setting can help with rotation behavior in supported fill workflows. Do not assume it independently controls every kind of mirror effect.
The goal is to flip the image horizontally in PowerPoint while preserving the container and its place in the layout.
How to Flip Multiple Pictures and Speed Up Repeated Edits
When preparing a photo comparison or training deck, repeating the same menu sequence can become tedious. A small workflow adjustment helps more than switching applications.
Select and Flip Multiple Pictures on a Slide
Select the pictures you want to change, using Shift-click or the Selection Pane, then apply the appropriate flip command.
Check whether you selected separate pictures or a group. Flipping a grouped arrangement can reverse the composition as a whole, including the relative placement of its contents. That may be useful for a mirrored layout, but unsuitable when each photo should stay in its existing position.
Before you flip multiple pictures in PowerPoint, duplicate the slide if you want an easy comparison.
For changes across many slides, a tailored macro may be appropriate. Avoid applying a blanket flip to a mixed deck: correctly oriented pictures would change too.
Add Flip Commands to the Quick Access Toolbar
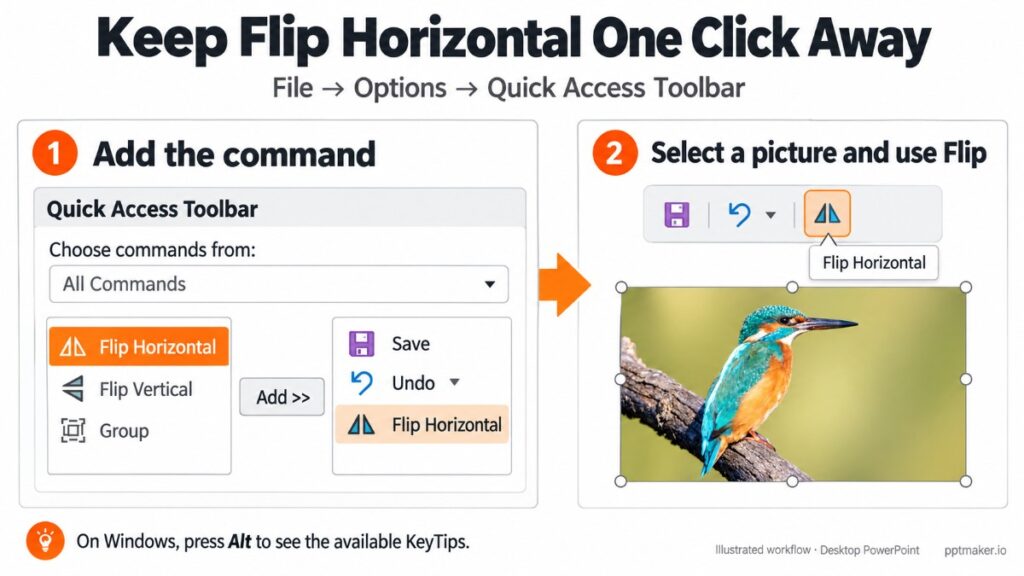
If you regularly flip a picture in PowerPoint, add the command to the Quick Access Toolbar in the desktop version.
On Windows, try right-clicking the command and choosing Add to Quick Access Toolbar. You can also use the toolbar’s customization options to find commands.
Pressing Alt displays the available KeyTips. These are more dependable than memorizing an online shortcut that may refer to another version, language, or object type.
A dedicated button is particularly helpful when you switch repeatedly between editing photos and arranging shapes.
Where PowerPoint and PPT Maker Fit in Your Workflow
Use PowerPoint to Adjust Pictures in an Existing Presentation
For an existing deck, PowerPoint’s built-in controls are the practical starting point. You can flip an image in PowerPoint, inspect it beside the slide text, and immediately adjust its crop or placement.
A separate image editor becomes useful when the change must happen inside the picture—for example, reversing a person while keeping a sign readable, or preparing a new source file to troubleshoot recurring orientation problems.
Choose the tool according to the edit you need.
Use PPT Maker to Create Slides from Your Content
PPT Maker fits an earlier stage of the workflow: turning text, PDFs, articles, and videos into presentation-ready slides.
Its Agent workflow helps organize content into a structured deck, while Creative focuses on visual slide generation. You can also refine individual slides with prompts.
That makes it relevant when your task has expanded from fixing a photograph to building the presentation around it. For the specific task of picture flipping in an existing PowerPoint file, use the image controls described above.

Frequently Asked Questions
Is Flip Vertical the Same as Rotating an Image 180 Degrees?
No. A vertical flip reflects the picture from top to bottom. A 180-degree rotation turns the whole picture halfway around. If a photograph is simply upside down, rotation usually restores its orientation without creating a reflection.
Can I Flip a Picture Without Reversing Its Text or Logo?
Not with a whole-image flip when the text or logo is embedded in the picture. Those pixels reverse too. Keep labels in separate text boxes, use an alternative image, or edit the relevant parts separately before inserting the result.
Why Doesn’t Flip Horizontal Reverse the Text in a Text Box?
PowerPoint treats the text and its containing shape differently. To create mirrored text, use the text object’s Format Shape → Effects → 3-D Rotation settings, such as an X rotation of 180 degrees. Check the appearance afterward because 3D settings can affect the object’s fill.
Does Flipping a Picture Reduce Its Quality?
The normal flip command changes orientation without requiring you to reduce the picture’s resolution. Quality issues are more likely to arise during compression, resizing, export, or conversion through the clipboard. Inspect those steps if a picture becomes blurry after your broader editing workflow.
Can I Flip Pictures in PowerPoint for Mac or the Web?
Yes. On Mac, look under Picture Format → Arrange → Rotate. In the web version, select the image and look for Picture → Arrange → Rotate. Ribbon layouts vary, so check collapsed groups or additional commands if the option is not immediately visible.
How Do I Undo a Picture Flip?
Use Ctrl+Z on Windows or Command+Z on Mac immediately after the change. Applying the same horizontal or vertical flip again also reverses that flip. If several edits have accumulated, compare with your original before making further adjustments.
Conclusion
Learning how to flip an image in PowerPoint starts with a simple choice: use Flip Horizontal to reverse left and right, or Flip Vertical to reverse top and bottom. Before moving on, check that the subject faces the intended direction and any text or logos still make sense.
When the result looks wrong, check the object and its existing formatting. A grouped picture, shape fill, or replacement image may need a different approach. If photos change after saving, test a freshly exported image and reopen the file to verify the fix.
With your pictures in place, you can focus on the story your slides tell. If you’re starting a new presentation, PPT Maker can help turn your content into a structured deck.